The science and magic of shooting moving pictures
Lossless Compression for DNG Raw Video
There are a lot of good things about raw video but data size is not amongst them. Uncompressed raw video can quickly add up and fill storage. One way of handling the size problem in post-production is to do some initial adjustments on the raw video, then bake to a lossily compressed format like ProRes, DNxHD or Cineform and only keep the compressed video for further post and/or archiving of the source material. The downside of this approach is that a bit of image integrity and re-processing options are ultimately sacrificed in lossy compression, which is not exactly the goal of optimal archiving and image quality.
This article describes an alternative simple workflow for lossless compression of DNG/CinemaDNG video footage, and also introduces DNGStrip – an utility that’s used to optimize file size. Lossless DNG compression allows a reduction in video file size while preserving all the benefits of a raw post workflow.
Update April 2015: I now have a much better solution for CinemaDNG/DNG lossless compression, which solves all the issues mentioned here.
Currently there are a quite a lot of cameras that shoot uncompressed raw DNG/CinemaDNG video, or processes which end up with DNG video sequences: Blackmagic Design Cinema Camera, Digital Bolex, Ikonoskop A-Cam DII, Kinefinity first generation cameras, Canon Magic Lantern raw video, Sony FS700 + Convergent Design Odyssey 7Q, etc. All of these would benefit from some kind of (lossless) compression.
Note that by lossless I don’t mean visually lossless. Lossless means truly lossless: pixels are exactly the same as in the uncompressed file. Key here is that the DNG standard provides for losslessly compressed DNG frames. In fact, that is exactly the compression format used in compressed DNG video produced by the Blackmagic Design Pocket Cinema Camera. Both Adobe Camera Raw and Blackmagic Design DaVinci Resolve 10+ support losslessly compressed DNG images.
So you start with uncompressed raw DNG/CinemaDNG sequences and end up with losslessly compressed raw DNG sequences. There are a couple of applications involved in the process. Both are free to use and available for Windows and Mac OS X.
Step 1: Adobe DNG Converter
Since Adobe spec’d the DNG standard, it isn’t surprising they provide an application that can compress DNG images. Adobe DNG Converter is straightforward to use for processing DNG video sequences. You specify a source folder containing the DNG footage and a destination folder for output; make sure that on the Preferences screen “JPEG Preview” is set to None and “Use Lossy Compression” is unchecked; then press Convert. That’s it. DNG Converter will recursively process any subfolders and compress sequences.

Adobe DNG Converter Preferences for losslessly compressing DNG video. Everything is either left unchecked or set to None.
You can stop at this stage and just use the resulting DNG sequences. That’s what many have been doing already. The compressed video works beautifully in DaVinci Resolve 10 and Adobe Camera Raw. And there is no speed penalty in Resolve for using compressed DNG video, or at least I can’t see any. If anything, compressed DNG needs less filesystem bandwidth and loads faster. The compressed footage is usually between 50% and 75% of the original size, depending on the nature of the source material. For example, the source footage for a short shot on Canon Magic Lantern raw was compressed from 710GB to 399GB, or about 56.2% of the original size. A sample Blackmagic Design Cinema Camera sequence was compressed to 75% of the original size. A sample Digital Bolex sequence was compressed to 51.5% of the original size. Note that these numbers are not representative of how footage from specific camera models will compress. Compression depends on content. More detailed images compress less; for example, shallow DOF images compress more and fine detail landscapes compress less.
There are both Windows and Mac OS X versions of DNG Converter. Current version is 8.3. Here are the links:
Adobe DNG Converter 8.3 for Windows
Adobe DNG Converter 8.3 for Mac
Now that the good stuff is out of the way, here is bad news. There are three problems with using Adobe DNG Converter for video compression:
- It is rather slow. The forementioned Canon raw footage – about 2:42h of 23.976 fps material in 1920×960 resolution – took 4 to 5 times its real time duration (or more than 11 hours) to compress on a decent modern Intel I7 powered PC. Make sure DNG Converter is running in the foreground, running it in the background (without its UI window showing) will slow it further.
- Be aware that DNG Converter will strip any CinemaDNG specific tags if they are present in the source DNG. These may include time code, frame rate, reel name, T-stop and similar metadata. That’s because DNG Converter is really meant to process raw stills and we are using it for video. This is not just a theoretical possibility, some cameras do use these tags. For example, the Blackmagic Design Cinema Camera uses the TimeCodes and FrameRate tags. If these are important to you, don’t use Adobe DNG Converter.
- As DNG Converter is stills oriented, it is not entirely concerned with size and will not produce the smallest file possible. It includes a small resolution (but uncompressed) thumbnail image into each and every DNG frame (around 100KB per frame, depending on image aspect ratio) and it also adds some useless tags to every file (for example, a 5.5KB XMP tag of entirely useless metadata). This may add up to some substantial disk space when a lot of frames are involved.
Step 2: DNGStrip
I have written DNGStrip to address issue number 3 and squeeze the maximum out of DNG Converter’s compression. DNGStrip is a free command line tool which processes DNG sequences produced by DNG Converter and strips them of thumbnails and unnecessary tags added by Adobe. It will also remove any JPEG previews included in the compressed DNG files in case you accidentally enable them when converting with DNG Converter. DNGStrip doesn’t change the actual image data in any way. DNGStrip is also pretty fast. Its speed will likely be limited by the speed of the storage drives used. It also keeps the files standard and therefore compatible with both Adobe Camera Raw and Resolve.
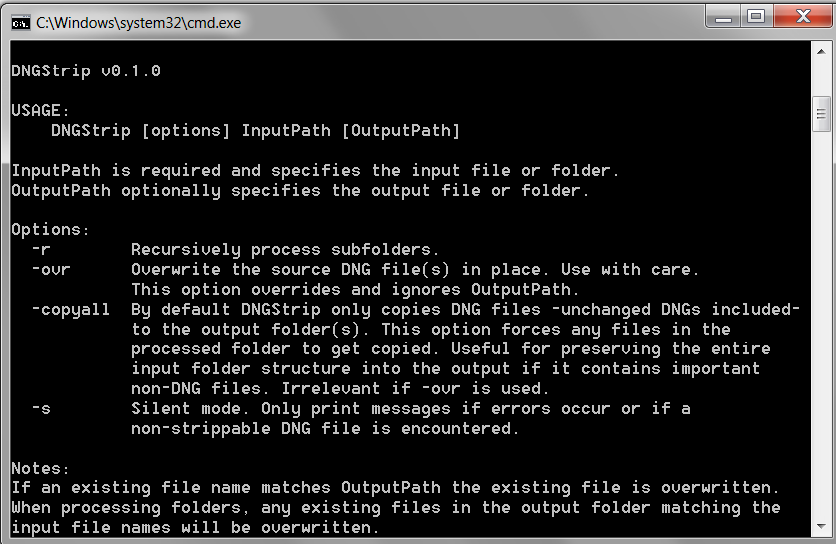
A screenshot of DNGStrip usage info as displayed in the console.
You can easily predict the gains of running DNGStrip over your DNG Converter compressed footage. DNGStrip will generally reduce frames by the same amount of bytes, provided they have the same aspect ratio. For example, Blackmagic Cinema Camera raw frames, Digital Bolex raw frames and Canon Magic Lantern 16:9 raw frames will all be around 114KB smaller (116 638 bytes, to be precise), and Canon Magic Lantern 2:1 frames will be around 102KB smaller after being processed by DNGStrip. So if your footage is homogeneous the gains after running DNGStrip are proportional to the number of frames processed. The forementioned Canon Magic Lantern 2:1 footage (a total of 233 516 frames) was reduced by DNGStrip from 399GB to 377GB, which is 53.1% of the original 710GB size. Quite a serious reduction, considering there is no loss of quality whatsoever compared to the original footage.
To put this in perspective: 377GB for 233 516 frames of 23.976 fps video means an average bitrate of approx. 317 mbps (in 1920×960). For Full HD (1920×1080) that would be equivalent to about 357 mbps. In comparison, 10-bit DNxHD 4:4:4 23.976 fps in 1920×1080 has a bitrate of 350 mbps. In other words, I am getting the full possible quality (14-bit raw, in case of Canon ML raw) at a bitrate comparable to a 10-bit intermediate lossily compressed codec. This is a real world example, but remember that gains will vary depending on the nature of the source material. The stripped raw footage plays in real-time in Resolve as long as your GPU can handle it (an oldish GTX 570 is good enough). This isn’t related to decompression, which is done on the CPU, rather to debayering and image processing. No need for fancy storage setups either, at least with 2K video. A clean or sufficiently defragmented HDD will do fine. I use a cheap WD Blue without issues. For 4K and above you will still likely need RAID or SSD though.
You can download DNGStrip here. Both the Windows and Mac versions are included in the .zip file.
DNGStrip for Windows and Mac
On Windows you may need to install the Microsoft C++ Visual Studio 2013 redistributable packages if they aren’t already installed on your system. Do this if you get an error about MSVCP120.dll or MSVCR120.dll “missing on your computer”. You can get the redistributables here.
Some quick notes about DNGStrip:
- DNGStrip is really only meant to be used with DNG Converter’s output. While it won’t do stupid things to differently sourced DNGs, running it over them is generally pointless.
-
DNGStrip is straightforward to use. In most cases all you’ll want to type is (make sure the current directory is the same as the one you’ve extracted DNGStrip to):
In Windows:
dngstrip -r SourceFolderPath DestinationFolderPath
And in Mac OS X:
./dngstrip -r SourceFolderPath DestinationFolderPath - Be careful when overwriting original files with the -ovr option. While I don’t expect any issues and the application itself will never overwrite files it doesn’t understand, it is better to be safe than sorry. Test with some bits of footage first. Also, note that overwriting is really meant to be used with SSD drives or when you plan to subsequently move the footage to another drive. Using -ovr with hard drives with the idea to leave the files there long term increases the fragmentation of the free disk space.
- For maximum speed it is best to use different physical drives for input and output, unless you are using SSDs. This also applies when running DNG Converter.
More details about DNGStrip can be found in the ReadMe file included in the zip. Make sure to read that before use.
Credit goes to Zolac at bmcuser.com for pointing out the thumbnails in DNG Converter’s compressed output, and for discussion and testing DNGStrip.